10 steps to Get it Done Safe & Hassle-Free!
Sweltering summer days make a properly functioning air conditioning system crucial fora comfortable driving experience. As the core heat-dissipating component of the AC system, a faulty condenser not only impacts cooling performance but can also cause abnormal system pressure, posing safety risks.
Don't worry ! We've compiled 10 key steps for condenser replacement-from tool preparation to final testing. We' ll guide you step-by-step to get the job done and restore your car's cooling power!
SAFETY WARNING
Condenser replacement involves working on a high-pressure system. Refrigerant poses risks of cryogenic burns and high-pressure injection. lmproper operation can cause personal injury or equipment damage. Many regions have strict legal restrictions on refrigerant venting; unauthorized release may result in legal liability.
If you lack professional equipment or repair experience, DO NOT attempt this yourself. Rplacement MUST be performed by qualified technicians.
Pre-Repalcement Preparation
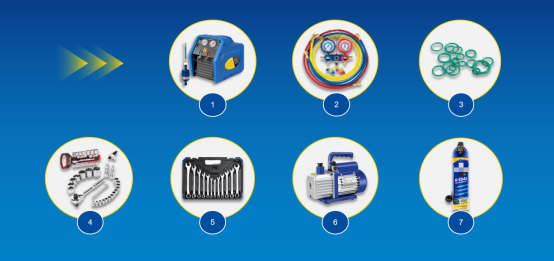
Tool Preparation

1. AC Recovery machine & tank
2. Manifold gauge set
3. AC line o-rings
4. Basic socket set
5. Wrench set
6. vaccum pump
7. Refrigerant
Safety Precautions:Wear cryogenic gloves, safety goggles, or a face shield. Ensure the work area is well-ventilated and free of open flames.
Ten Practical Steps, Step-by-Step Condenser Replacement Guide
1. Evacuate Refrigerant
Before replacement, fully evacuate high-pressure refrigerant from the AC system using a manifold gauge set (red for high pressure, blue for low pressure, yellow for recovery). Verify all connections are leak-free. Start the recovery process with a refrigerant recovery machine. When both high and low-pressure gauges read zero, recovery is complete. Proceed to the next step.
2. Remove Obstructing Components
To remove the condenser, disassemble components such as the front bumper, grille, cooling fan, and brackets. Before any disassembly, disconnect the electrical circuit. The parts to be removed and disassembly procedures vary between models—refer to the OEM service manual for details.
3. Disconnect AC Lines
Before removing refrigerant lines, wear safety goggles or a face shield to prevent injury from refrigerant spray. In most cases, lines are secured by bolts or hard fittings, which can be removed with a wrench.
4. Remove Old Condenser
Unscrew all bolts securing the condenser (some may be shared with the radiator), then gently remove the old unit. Ensure no parts or wires are left attached. Avoid scratching nearby components or damaging the cooling system during removal..
5. Install New Condenser
Before installation, compare the new condenser’s size, ports, and mounting points with the old one. Do not force-fit if they don't match. Once confirmed, add an appropriate amount of moisture-free refrigerant oil to the condenser ports (refer to the vehicle service manual), then mount the new condenser using the original brackets.
6. Reconnect AC Lines & Replace Receiver-Drier
Replace all O-rings and lubricate them with refrigerant oil before reconnecting lines. Torque fittings to specifications. Replace the receiver-drier/accumulator since the system was exposed to air—this prevents moisture-related failures. Note: O-rings are single-use and MUST be replaced to avoid leaks.
7. Reinstall Removed Components
Reattach the front bumper, grille, brackets, etc., aligning all mounting holes. Verify all screws and electrical plugs are securely connected to restore original structure.
8. Vacuum Leak Test (30+ Minutes)
Connect the manifold gauges to high/low ports. Run a vacuum pump or recovery machine for ≥30 minutes. Shut off the pump and wait 10 minutes. If gauge readings hold steady, the system is sealed. If pressure rises, locate and repair leaks before adding refrigerant.
9. Recharge Refrigerant
Connect the manifold gauges to high/low ports. Run a vacuum pump or recovery machine for ≥30 minutes. Shut off the pump and wait 10 minutes. If gauge readings hold steady, the system is sealed. If pressure rises, locate and repair leaks before adding refrigerant.
10. Test AC Performance
After charging, start the vehicle and turn on the A/C. Let it run for about 5 minutes and observe system performance. Measure the temperature difference between the center vent and ambient air—it should exceed 4°C. If the system cools quickly and shows a noticeable temperature drop, it is functioning properly.

ABOUT FARET
With 25 years of expertise in automotive thermal management, FARET sets the global industry benchmark. Our integrated R&D, intelligent manufacturing, and sales network are powered by three intelligent factories in China, delivering an annual capacity of 8 million units. Our solutions cover 95% of global vehicle models and serve customers in over 100 countries, meeting diverse market demands with precision and reliability.


